If you’ve ever been in a modern office, data center, or even a high-end retail space with sleek, uncluttered floors that hide a maze of cables, wiring, and utility lines, you’ve probably stood on an access floor. As a supplier of these systems, I get asked all the time: “How do you even install something that looks so simple, but works so hard?” It’s not just laying tiles over a metal frame—access floor installation is a precise, step-by-step process that requires attention to detail, heavy-duty materials, and an understanding of exactly what the space will be used for. Over 12 years of working with project managers, contractors, and facility teams, I’ve seen bad installations turn into costly headaches, and good ones turn into spaces that run smoothly for decades. Today, I’m breaking down exactly what goes into installing a reliable access floor, straight from the perspective of someone who’s been on job sites, troubleshooted misalignments, and delivered hundreds of systems across North America. Access Floor

First, let’s start with the planning phase, because the installation doesn’t actually begin with any tools on the floor. Too many teams skip this step, assuming all access floors are the same, but that’s a mistake. Before we even order a single component, we spend hours on site measuring, verifying, and consulting with the client and their architect. The first thing we confirm is the subfloor condition. The subfloor is the base the access floor will sit on, and it has to be perfectly flat and structurally sound. If there are high spots, low spots, or cracks, we have to fix that first—even if it means grinding down a concrete slab or patching a wood subfloor. For a data center, for example, we need a subfloor with a compressive strength of at least 3,000 psi, because those floors will hold heavy server racks that can weigh 2,000 pounds each. For an office space, the requirements are a bit lighter, but we still need to make sure the subfloor won’t shift or settle over time.
Next, we talk about the load rating. This is non-negotiable. A low-grade access floor for an office won’t hold the weight of server hardware, and a data center floor designed for server racks is overkill (and way more expensive) for a retail store with foot traffic. We also figure out the height of the access floor system. The height is determined by how many cables or pipes we need to run under it, plus any future expansion—no one wants to install a 6-inch floor now only to find out they need to run more cables in a year and can’t lift the tiles to get to them. We also mark out any cutouts we’ll need: for vents, electrical outlets, or specialized equipment. If you need a tile to fit around a pillar or a conduit, we cut it before we get on site, so we don’t have to do on-the-spot cutting that can create rough edges or uneven fits.
Once the planning is done, it’s time to bring the components to the job site. Every access floor system has four core parts: pedestals, stringers, panels (the tiles), and finishes. Pedestals are the adjustable metal supports that hold the floor up—they’re like the legs of a table, but with built-in height adjustment so we can level the entire floor perfectly. Stringers are the horizontal metal bars that connect the pedestals, creating a grid for the panels to sit on, and they help distribute weight evenly across the entire floor. Panels are the actual tiles, usually made of steel, aluminum, or wood core with a laminate or vinyl finish. The finish is another planning detail: we offer everything from anti-static laminate for data centers to wood-grain vinyl for office spaces to carpet for commercial lobbies.
Now, the actual installation starts, and I can’t stress enough how the first step—laying the perimeter stringers—sets the entire project up for success. You start at the longest wall in the room, measuring out from the corner to make sure the first stringer is exactly level and aligned with the walls. Perimeter stringers are critical because they anchor the entire system to the building’s structure, preventing the floor from shifting or moving over time. We use a laser level here, not just a tape measure and a spirit level—laser levels catch tiny inconsistencies that would throw off the whole floor. If the perimeter is off by even a quarter of an inch, every subsequent panel will be uneven, and that’s a problem for both safety and appearance.
Once the perimeter stringers are secured to the subfloor—usually with adhesive or concrete anchors, depending on the subfloor material—we start placing the main stringers. Stringers are spaced based on the panel size: most access floor panels are 24×24 inches, so stringers go 24 inches on center, leaving exactly a 24-inch gap between each set of stringers. This spacing is intentional: it means each panel sits on two stringers, so weight is distributed evenly. For areas with heavier loads, like server zones in a data center, we narrow the spacing to 18 inches, so the panels have more support and won’t bend under heavy equipment. Every stringer is adjusted for height as we go, using the laser level to make sure the entire grid is perfectly flat from one end of the room to the other. I’ve seen contractors skip adjusting stringers and end up with a floor that’s 1/2 inch higher on one side than the other—trickling water in the office, or making it impossible to roll a server cart across without jostling equipment. That’s why this step takes time; we don’t rush it.
After the stringer grid is in place and fully level, we move to installing the pedestals in the spaces between the stringers. Pedestals snap into the notches on the stringers, so they’re held firmly in place, and each one has a threaded top that lets us adjust its height individually. For standard heights, that’s easy, but for spaces where we need a taller floor, we might use extension pedestals. Every pedestal gets checked with the laser level again to make sure it’s at exactly the right height—no pedestal is too high or too low, because even a 1/8-inch difference will make a panel rock. This is another part where attention to detail matters. I once had a contractor call me panicking because half their panels were rocking, and when we checked, they had skipped adjusting three pedestals along a stringer, assuming they were all the same. We had to pull 15 panels, adjust each pedestal, and reinstall—wasting a full day on a mistake that could have been avoided if they’d just taken the time to check each one.
Once all the pedestals are set, the next step is the panel installation. This is where the system starts to look like a finished floor, but it’s not just setting a tile down. We start in the opposite corner from the door, because that’s where the traffic will be lowest once the floor is done, so any minor misalignments won’t be noticeable under foot. Each 24×24 panel is lifted and set onto the pedestals, with the edges fitting exactly between the stringers. We press down gently to make sure each panel sits firmly, with no gaps between adjacent panels. If there are cutouts for vents or outlets, those panels are cut with a precision saw before installation, so the edges are clean and the cutout fits snugly—no loose pieces that could create a tripping hazard, or gaps that let dust get under the floor.
After all the panels are in, we do the final level check. This is a multi-step process: we run a straight edge across every row of panels, roll a heavy weight (like a 50-pound metal bar) across the entire floor to make sure no panels bend or rock, and check for any gaps between panels—no more than 1/32 of an inch, which is almost invisible to the eye, but important for appearance and durability. If we find any uneven spots, we adjust the pedestals under the affected panels until they’re perfectly level. For floors with higher load requirements, like data center server zones, we also run a deflection test: we place a 2,000-pound load on a single panel and check that it doesn’t bend more than 0.02 inches. That’s not something you can eyeball—we use a deflection gauge to measure it, because a bent panel under a server rack can cause downtime, which is way more costly than the extra time it takes to test.
But wait—we’re not done yet. The final step is access and finishing touches. Every access floor needs access points: panels that can be easily removed to get to the cables, wiring, or utility lines underneath. Some access panels have pull tabs built into the edges, so you don’t need tools to lift them, while others are secured with latches for higher-security spaces. We also install edging around the perimeter of the floor to cover the gap between the access floor and the walls—this prevents dust from getting under the floor and makes the transition from the access floor to other surfaces (like regular tile or carpet) smooth. For spaces with specialized needs, we might add other components: cable management trays under the floor, power or data outlets mounted in the panels, anti-static grounding for electronics, or vented panels for cooling in server rooms.
Over the years, I’ve seen clients cut corners on installation to save money, and almost every time, it comes back to haunt them. A small office client once hired a contractor who used low-grade pedestals and skipped the final level check, and within six months, the floor had several rocking panels, a panel had cracked under a heavy desk, and they had to replace the entire system. Another data center client saved a little by not using a laser level, and they ended up with a floor that was 3/4 inch uneven—enough to make rolling server carts across the floor difficult, and enough to require rework on the entire system. That’s why, as a supplier, I don’t just sell you the access floor components—I recommend working with contractors who have experience installing access floors, because this isn’t a standard tile job. It requires knowing how each part works together, how to adjust for subfloor inconsistencies, and how to meet load and level requirements specific to your space.
Access floors are one of those building materials that are invisible until you need them, and when you do, they’re irreplaceable. They hide messy wiring, make it easy to update utilities without tearing up the floor, improve air flow in data centers, and create a clean, uncluttered look in modern offices. But none of that works if the installation is sloppy. It’s not just about the products—you have to have the right planning, the right tools, and the attention to detail to get every pedestal and panel exactly right.
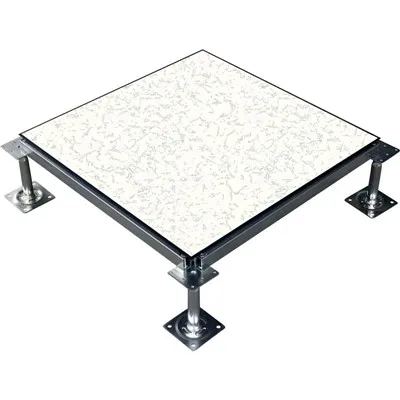
If you’re planning a project and you need an access floor that’s reliable, durable, and installed correctly, I’d love to talk through your needs. Whether you’re outfitting a new data center, renovating an office, or building a retail space, we can help you choose the right components and connect you with trusted installation partners to get the job done right. Don’t leave your access floor to chance—reach out to start the conversation.
Modular Raised Flooring References:
Access Floor Systems: Design, Installation, and Performance. Floor Covering Institute, 2021.
Data Center Infrastructure Standards for Access Floors. Telecommunications Industry Association, 2022.
Commercial Access Floor Installation Best Practices. National Floor Trends Magazine, 2023.
Load Rating and Structural Requirements for Raised Access Floors. American Society of Civil Engineers, 2020.
Fineco Tech Co., Ltd.
As one of the most professional access floor manufacturers and suppliers in China, we’re featured by quality products and good service. Welcome to wholesale customized access floor made in China here from our factory. If you have any enquiry about cooperation, please feel free to email us.
Address: Wuyue Square, Wujin District, Changzhou, Jiangsu, China
E-mail: info@finecotech.com
WebSite: https://www.finecoglobal.com/
